
Initial Steps to Get Your WordPress Website Listed on Google
Search engine optimization is known as one of the most important factors of any WordPress project`s success. Strictly saying, SEO is equal to your WordPress website`s popularity. That is why you should not miss any opportunity to improve your website due to the demands of search engines.
The main goal of search engine optimization is to cover all (or at least the majority of) demands of Google. We have recently shown the main share Google has in comparison with other worldwide search engines. There is no doubt that a beginner in the field of website administration should set up goals due to Google`s search engine demands.
It is also very important to take the right first steps after you install your WordPress website. One of such steps is the registration of your sitemap via Google Webmaster Console. In this article we will give you the detailed guide on how to make this first crucial step on your road to SEO success.
Why Is Sitemap Registration So Important?
Google has created an image of the all-knowing algorithm among the modern internet users. So, there appears a logical question about the need of registering something manually for the being listed on Google. Most beginners make this mistake by believing that Google will do all the work by itself.
The main goal of registering your sitemap on Google Webmaster Console is the significant acceleration of the process. You can be sure that Google will find and index your website somehow in the future but it is more reliable and responsible to take steps towards the search engine to help it see all of your website`s main pages earlier and in the right order.
Preparing the Tools
Essentially you will need three tools to accomplish your website`s sitemap registration on Google: your WordPress website, Yoast SEO plugin and Google Webmaster Console. All three tools are free of charge. You will only need some time to register through the Google Webmaster Console, install and register your Yoast SEO plugin copy.
WordPress Settings Check
 The first step you should take is to check whether your website is allowed to be listed by search engines. The point is that there is a separate option on WordPress that enables or disables your website`s pages from indexing by Google and other search engines. If this option is set to disabled mode, then all of your further action will have no sense.
To check this option, go to Settings menu on your WordPress dashboard and choose the Reading submenu. Scroll down before you find the Search Engine Visibility Option. Make sure that the checkbox is not activated. If it is activated, than you should uncheck the box.
Yoast SEO Plugin Installation
As we have already mentioned above, you will need to download, install and register your copy of Yoast SEO plugin. This tool will offer you much more features then a sitemap registration on Google. It will help you to optimize your text and meta content through a convenient form under each post or page editor.
You can also find the complete guide on installing and using Yoast SEO plugin in our dedicated blog article. Feel free to use this guide for the sake of time and effort saving matters.
Google Webmaster Tools Connect
 Google Webmaster Tools (also known as Google Search Console) is the service you need to register in. After you pass a simple sign up process, you will be offered to add your projects to the console. To perform this action, find the red button with Add Property text on it. It is important to enter the full URL of your website with www, http or https (depending on real prefix your project uses) because Google sees a great difference between www and http prefixes, for instance.
After you have added your project to the console, you need to verify it. There is a number of recommended methods on one verification tab and alternative methods on the other. You need to visit alternative verification tab and find HTML tag field. There you will find and automatically created code which you should copy.
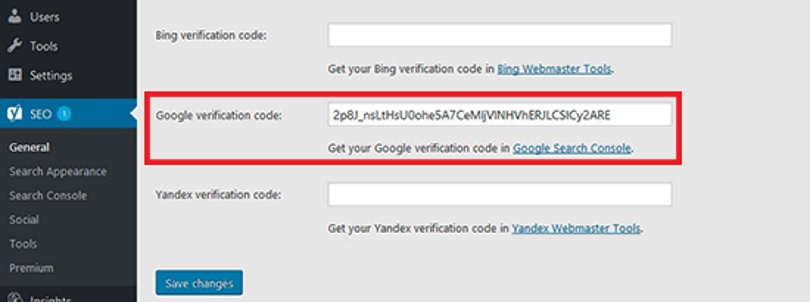 Go back to your WordPress dashboard and find SEO menu. General tab will offer you to enter Google verification code which you have copied from Google Webmaster Tools. Save changes and return to Google Webmaster Tools dashboard to push the final Verify button.
XML Sitemap Setup
XML sitemap creation is pretty simple via Yoast SEO plugin. You just need to visit General SEO menu and find Featured tab in it. Then scroll down to find the XML sitemaps option and make sure it is turned on. Your website`s XML sitemap will be created and updated automatically.
 To observe the result of automatic plugin`s work, click the question mark next to XML Sitemaps title on the dashboard. Here you will get the link to see full sitemap of your website.
XML Sitemap Submit
The final step is to submit your XML sitemap to Google via the Webmaster Tools dashboard. Go to Google Search Console and find Crawl tab on the left sidebar. Choose the Sitemaps submenu push the Add/Test Sitemap button. Enter your domain name plus “sitemap_index.xml” to download all needed data to Google.
 After a few days you can go to Google Webmaster Tools dashboard to check how the listing process goes. If everything went good, then you will see the current ranking of your website within the Google search engine rating. Of course, you should not expect any high position at the start of your project. But this way you can track your website`s progress on search engine optimization and ranking process.


Leave a Reply
Want to join the discussion? Feel free to contribute!