
Creating a Multisite Network With WordPress
The Multisite feature was introduced with the creation of WordPress 3.0 in 2010. When Multisite is activated on your WordPress website you can create separate sites on the same installation of WordPress. Every site uses the same database and shares themes and plugins, but use separate tables – and each site has its own media directory. There’s many applications for Multisite networks such as small business sites with different departments, a network of affiliated blogs, directory sites that users rent space on and more. This guide show you how to activate the Multisite feature and add new sites to your network.
What is a Multisite Network?
A Multisite network is a group of sites that are managed from a single site. According to The Codex a Network is defined as…
“In the WordPress user interface, a network is a collection of separate sites created in a single WordPress installation by the Multisite feature.The sites in a WordPress network are not interconnected like the things in other kinds of networks. They are very like the separate blogs at WordPress.com. In WordPress code the network is known as the site and the sites are known as blogs.”
You can run many different sites on your server when you install WordPress. The best example of a Multisite network is WordPress.com. WordPress is host to millions of sites for free – allowing users to add plugins and themes at a nominal fee.
Installing WordPress one time can let you run an unlimited amount of sites in theory. Of course you will be limited by the amount of data your server can handle. You most likely won’t be hosting millions of sites on a typical Multisite installation. In fact, managing many sites can be quite a task, luckily there are many plugins to help you do this.
The best thing about the Multisite feature is that the WordPress dashboard is basically the same as a single site installation. It uses the same source files as well as structure. Really running a Multisite network isn’t much more difficult than managing a single site thanks to this feature. Installing plugins and themes is exactly the same, and all plugins and themes installed will be available to every site.
There are a few differences but they won’t be hard to get used to. The dashboard will be slightly different as the options have changed. The admin screens, files and database tables will all be a bit different than you are used to.
Why Create a Multisite Network?
There are many reasons why you’d want to go with a Multisite installation of WordPress. Maybe you are trying to collect a business directory where users can edit or add their own content by subscription, a blog with different layouts for each post or a network of client sites administered by a single developer.
It’s quite popular for individuals to create their own networks of personal sites. This can be useful for a web developer who wants to show different sites as examples, or for someone who wants to create a network of blogs that each have a different category or theme. If you use domain mapping, you can even use a different domain name for each site. This can come in handy if you want to make global changes to a lot of different sites that you are managing.
Reasons You Don’t Need a Multisite Network
There are many use cases for a Multisite network, but it’s not always the best way to solve your problem. Folling are some expamples why you couldn’t want to use this features:
- You are running a single site or blog with no plans of expanding
- You are managing multiple sites for your clients, yet they are all on separate hosts
- You need each site to have an individual database
- You have shared hosting that is not adequate enough to support a multinetwork site.
- Admin on the site wants a separate
You don’t have access to the server files. Perhaps you have are using GoDaddy to host your site, yet you didn’t purchase managed WordPress hosting, you won’t have access to the ftp. If any of these apply to you may want to Switch Providers or purchase an appropriate service host.
How to Activate Multisite in WordPress
The first thing you’ll need to do is make sure you have adequate hosting. If you don’t plan on building a large number of sites and you aren’t expecting heavy traffic, shared hosting is probably fine. Most of the time you are going to need a VPS (virtual private server) or dedicated server to accommodate your site’s growth. Check out our guide on hosting for more info. I use BlueHost because they provide both and are one of WordPress’ officially recommended hosting partners.
Now that we got all of the requirements out of the way and you know a little bit about Multisites you are ready to activate the features and create your network. How you go about it will depend if you already have a site installed, or whether you are starting from scratch. You also need to figure out if you want to use subdomains or subdirectories as explained below.
To use a subdirectory each site will have a url that looks something like the following:
http://subdomain.yourwebsite.com
If you want people to create their own sites on your network, you will have to enable wild card subdomains for your host, which we will show you how to do.
To use subdirectories each site will have a url such as
http://yourwebsite.com/subdirectory
If you already have a site established, meaning you’ve had it installed for over a month, using subdirectories can cause problems with existing urls on your site. Now you can activate your site.
Activating the Multisite Feature
The difference between activating Multisite on a fresh install between activating it on an established site is minor. On an established site you won’t have the option to choose if you want to use subdirectories or subdomains. You will be forced to use subdomains, which is what I will be doing.
First if you haven’t already, Install WordPress, this should only take a few minutes. After the install is complete, open up your wp-config.php file. Since I am using Bluehost, I can find this file in my cPanel under the file manager.

Next click the File Manger Icon
Navigate to the Web Root files
Locate the wp-config.php file to edit Above the /* That’s all, stop editing! Happy blogging. */ paste in the code to activate the Multisite feature
Now you will need to go to the dashboard of your WordPress site to install the Multisite. Make sure all your plugins are deactivated, you can activate them later. Go to Tools>Network Setup. Enter the code that WordPress provides you in the Network Setup section in the config.php and .htaccess files and then save them. Make sure to back these up first in case something unexpected happens.  In the .htaccess file make sure you REPLACE the code from the original file.
Replace with the following code for subdomains. If you are using sub directories refer to WordPress for the proper code.
 After you have saved both files you are done. You will just need to log in again and your dashboard will be updated as shown below. Notice the key with “My Sites” in the upper left hand corner?

Creating a subdomain
Now you have a central dashboard to run multiple sites on your network. From the cPanel you need to create a subdomain before you can add a site to it. Click on the Subdomains.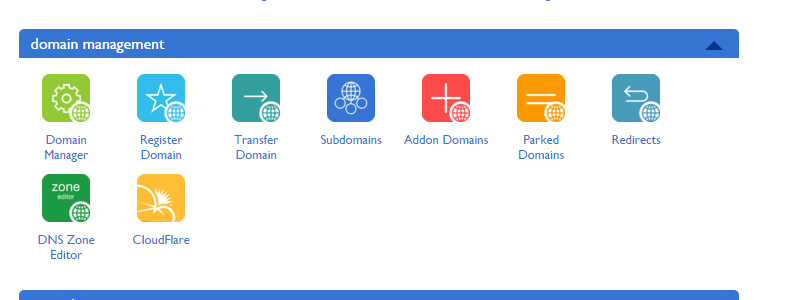
Now enter in the information and click create. I have already created one below as you can see.

Creating a site
Go to the Network Admin Dashboard and go to Sites>Add New. Fill in the subdomain that corresponds with the one you create with your hosting service, in my case it’s “testsubdomain.” Now you will be able to add themes to your site, activate plugins and do anything else you’d expect from WordPress.
You can see that now you will have access to the site in your dashboard where you can manage your site just as you would normally. You may also change the primary site by visiting “My Sites in the dashboard menu. Now if you go to “Sites” in the network admin dashboard you will see a list of all your subdomains as well as your primary site.

Setting Up Your Sites
Each site has it’s own dashboard where you can activate themes, plugins and more. There are many useful plugins for maintaining your network to make things easier. The next step is to setup your sites. Checkout WordPress’ codex for maintaining your network as well as their other pages for more technical information on Multisite Networks. Let us know your favorite plugins for managing your network and any tips you have for setting up Multisite in your WordPress installation.


Leave a Reply
Want to join the discussion? Feel free to contribute!